Thursday, January 27, 2011

Winter Explorers


Looking for Signs of Winter

While discussing winter during circle time children shared their knowledge:

• winter is cold
• it snows in the winter
• we can make snowmen
• we can go sledding in the snow
• we have to wear warm clothes

We learned that in the winter it is cold and cold can change things. It changes the way we dress, the way the trees look, the way animals behave and the way we play outside. To see it for ourselves, we went outside to look for signs of winter…

Winter sure has changed the way the trees look.
Children: “Look morah, there’s no leaves on the trees.” “I see bare trees everywhere.” “They look like giant sticks.” “It’s cold out here.”

Child: “I found ice!” “I want to touch it.” “Why is the ice here?”
Morah: “Remember we talked about how cold can change things. Well this was water before but the cold changed the water and now it is ice. Cold can freeze things and change them into ice.”

 
Children: “Look everybody, I found more ice.” “It’s cold.” “It’s hard.” “My hand is cold now.” “My hand is cold too.” “And wet.” “Let’s look for more ice!”


Child:  “I found ice in the blue car.”


Child:  “There’s more ice here in the red car.”


 Children: “I found more ice!” “There’s ice everywhere!”
Child: “Look, there is a leaf on the ice.”
Morah: “Can you pick it up?”


Child: “I can’t get it, it’s stuck.”
Morah: “Oh, it’s stuck? Remember how cold can freeze things?
That is why the leaf is stuck; it is frozen to the ice.”

 
 Children: “There is ice in this hat.” “I want to see!”
Morah: “Can you pour it out?”

                                    
 Children: “No, it’s not coming out.” “It’s freeze.”
Morah: “That’s right; it’s frozen inside the helmet.”


Later in class during goodbye circle we reviewed what we found and learned during our outdoor experience. We talked about how cold can change water into ice and the differences between
water and ice.

We also experimented with a cup of water.
Can you mix it? YES
Can you pour it? YES
How does it feel? WET

What do you think would happen to the water if we left the cup outside?
• IT WILL SPILL
• IT WILL FREEZE
• IT WILL ICE
• A SQUIRREL WILL DRINK IT

Should we put it outside and find out? YES

 
The next morning we saw that the water changed into ice and we experienced with it.
Can you mix it? NO
Can you pour it? NO
How does it feel? COLD, HARD


What do you think will happen to the ice if we left the cup in our classroom?
• IT WILL FREEZE
• IT WILL SPILL
• SOMEONE WILL EAT THE ICE

After about an hour we checked on the cup and saw that there was no ice in there.

Children: “Now there is water!” “What happened to the ice?”
Morah: “Remember how cold can freeze water and change it into ice. Well in our classroom it is warm and warm can melt frozen things and change ice back into water.”


Sunday, January 2, 2011

Happy Chanukah

Chanukah is such fun and special time of year. 
We love to experience the joy and the practices of holidays in our class.
We began the unit by first remembering all the Jewish holidays we’ve already experienced and celebrated this year. We looked through our Jewish Holiday Book and recalled what we did during Rosh Hashana, Sukkot and Simchat Torah. During each holiday we did special things, ate special foods and celebrated.

So what is Chanukah all about?  What do we do on Chanukah?  How do we celebrate Chanukah?
Chanukah is an 8 day celebration during which we light the menorah, play dreidel, eat foods made in oil and have fun while we watch the candles shine. All the things we do on Chanukah help us remember a story that happened a long time ago…


The Story Retold with puppets:

This story happened a long time ago in a beautiful place called Israel. Israel is a place where all the Jewish people lived. There were stores in Israel and parks and libraries and the Jewish people were really happy living there. Everyday they would wake up in the morning get dressed, eat breakfast, go to school and learn the Torah and about Hashem. What was extra special about Israel is that it is the place where there was the special, beautiful Holy Temple. 
When you hear the word Holy Temple, what do you think it looks like? 
This was a big, beautiful synagogue, a shul that was decorated and made with shiny gold. Everyday people would travel and come to the Holy Temple so they could do mitzvoth and feel close to Hashem. Each day one man would go into the Temple and light a magnificent menorah.
  
The menorah is a special candelabra that holds lots of candles.

 The menorah in the Holy Temple was SO tall that the man would have to use stairs to climb to the top so he can reach the menorah to light it. Everyday he would fill the menorah with oil and light it so everyone could see the light. Each time he would light the menorah he would make a special blessing thanking Hashem for giving us the special mitzvah of lighting the candles. All the Jewish people were grateful and happy for living in the land of Israel, this is where they celebrated all the holidays like Rosh Hashana, Sukkot, Shabbat and they were happy because everyday they would light the menorah in the big, beautiful Temple.
    There was a king in Israel and he was not a very caring king. His name was King Antiochus and he did not nice things and he wanted all the people to do not nice things just like him. He did not want the Jewish people to do mitzvot anymore. He said, “I don’t want you to do good things like light the menorah or make Challah for Shabbat or celebrate the holidays." The Jewish people were very sad and upset at what King Antiochus said. They loved the Torah and the holidays and they loved doing the right things.
    The Jewish people knew they had to do the right thing and stop King Antiyochus. So they all joined together and said, "We need to be brave and do the right thing." Together the people chased King Antiyochus away from Israel. They were so excited, they danced and they cheered. Now they were able to do all the mitzboth, and celebrate the holidays and light the menorah.
They quickly went to the Holy Temple to get ready to light the menorah again but they couldn't find any oil.
 They looked everywhere and finally found just a little bit of oil. The little bit of oil was not enough to make the menorah shine for a long time but Hashem helped them and made the oil last a long time and made the menorah shine for 8 whole days. Everyone was so happy and celebrated together.
    Every year we tell the story about the Holy Temple and we get our menorahs and light them. We put the menorah in a special place so everyone can see the beautiful light. We gather our family and together we make the blessing and light the menorah. For every night of Chanukah we light a candle on the menorah. While we watch the mehorah shine we eat yummy holiday food like latkes and donuts and play spin the Chanukah dreidel.

While celebrating and learning about Chanukah children patiently placed and counted candles on the menorah. "Morah, why is the middle candle sticking up high?" We learned about Shamash the 'helper candle' which is the ninth candle on the menorah and sits in the middle a little bit higher than the rest of the candles.  Children loves pretending to light the candles using the 'helper candle'.

Children worked together to paint a big class menorah.                       Morah: "Where should we put the menorah when it's all done?"        Kids:  "By the window." "By the door."  "Outside."  "In the hallway."
We also made candles for our big class menorah. 
This may look like JUST painting but we are actually developing many important skills. 

Social - Interacting with peers and developing relationships while sharing space, a craft and art supplies.
Problem Solving - "Morah, I'm holding the candle so it doesn't move when I'm painting."
Cause and Effect - "It's not moving anymore because I am holding it like this."
Attention Maintenance - You can just see the level of concentration on those little faces.
Fine Motor & Pencil grip- Look at those little fingers and hands at work.
It's never to early to practice our pencil grip.
Look at how gently and loosely those little fingers are gripping the paint brush.


Dramatic Play - Imitation and Symbolic Play - "I'm making latkes, this is the oil."

 
Matching - Letter Recognition - Pre-reading Skills
"I can match the letters." "I see my letter." "What letter is this?" "What does this say?"

Counting Dreidels - One to one correspondence - Number Recognition
Watching dreidels spin is so much fun but it's not easy making them spin! Dreidel games provided a great and fun opportunity for children to work on fine motor skills, determination and patience.

We also practiced all those important Social, Problem Solving , Cause and Effect , Attention Maintenance, Fine Motor and Pencil grip skills while making our take home menorahs.

Monday, December 6, 2010

Thanksgiving Sharing Pie

Objectives:· Social/Emotional – Children will discover and experience the value of sharing and work together to create a collective craft.
· Math – Children will use critical thinking while practicing sharing and problem solving. They will also practice counting, number recognition, matching and one-to-one correspondence.
· Fine motor – Children will strengthen fine motor skills by working with small pieces of paper.
 

Attention getter:
THE BOX intro: Box, box, what's in the box? It could be something really big or something really small. It could be a toy or it could be a ball. It could be anything at all. Do you want to see what's in the box? OK, on the count of three. 1 2 3 All eyes on me!

Morah takes out a printout of a pumpkin pie:
Morah: WOW! Look at this yummy pumpkin pie. What shape is the pie? What colors do you see on the pie? What kind of pie do you think this is? Have you ever had pumpkin pie? What did it taste like? Oh, I bet this pie is soooo yummy and delicious. I bet it will taste sweet and creamy; I just can't wait to eat it. Do you have a pie?
Kids: "No, I don't have a pie :(" "I want a pie" "Can I have a pie?"
Morah: Oh, you don't have a pie:(?! I want you to have some pie too but I only have one pie. What can we do?.....
Kids: "You can rip it" "You can cut it" "You can share the pie with us!"
Morah: We can share this pie :)?! Oh what a great idea!!! We can cut this pie and everyone can have a piece. Would having a piece of this pie make you feel happy?
Kids: "YES!" "I want some pie" "Can I have some too?" “I like pie” "Let's share the pie" "YAY! We're going to share the pie!"
Morah: You know what? I think sharing this pie with you would make ME happy too!!!! I think eating this pie all by myself would not be as fun but sharing it with you sounds like SO MUCH FUN!!! But wait, how can we find out how many pieces of pie we need?
Kids: "We can count" "We can count how many friends we have in class"
Morah: Ok let's count our friends. Can you help me? 1 2 3 4 5 6 7 we have 7 friends
Kids: "And you Morah" "Don't forget Morah!" "We have 8 friends" "We need to cut 8 pieces of pie"
Morah: OK so now we know we need to cut this pie into 8 pieces. First let’s use this marker to draw the lines and divide the pie into 8 equal, same size pieces.

Morah draws a line down the middle of the pie.
How many pieces do you see? Let's count. 1 2 Is that enough for everyone?
Kids: "NO" "Only two people can share this pie" “We need more"

Morah draws a line across the pie.
How about now? How many pieces do you see? Let's count. 1 2 3 4 Is that enough?
Kids: "NO" "Let's draw another line"

Morah draws a line diagonally.
Let's count and see if this is enough. 1 2 3 4 5 6 Is that enough?
Kids: "NO" "Let’s keep going" "Draw more lines"

Morah draws another diagonal line
Morah: How about now? Lets count
Kids: 1 2 3 4 5 6 7 8 "That's enough" "We have 8" "Everyone can have a piece" "Let’s share the pie"
Morah: Great but before we cut it let's count the pieces again and number them just to make sure we have enough for everyone (children count while Morah numbers each piece of pie)
Morah cuts the pie, gives everyone a piece and we pretend to eat it. YUM!


Morah: Did you have fun sharing this pie? Me too!! I would not have this much fun if I ate this pie all by myslef. It's more fun to share! Let’s think of other things we can share.... What can you share?

Morah asks each child what else they can share and writes the response on their piece of pie.


Art:


Morah puts out the round cardboard and cut up paper on the table with children sitting around it.
Morah: I have this big round piece of cardboard. I wonder what we can do with it? Does this round cardboard remind you of something else that's also round?
Kids: "A wheel" "Pizza" "A pie like the pumpkin pie we shared"
Morah: Yes a wheel is round and a pizza is round too, you're right. OH yeah!!! You're right, this IS round just like the pumpkin pie we shared before.

Morah shows a picture of a whole pumpkin pie just like the one we previously shared.
Morah: Would you like to make this round cardboard into a big pumpkin pie?
Kids: "YES!" "Let's make a pumpkin pie" "Are we going to share it?"
Morah: Sure we can share it. It's more fun to share! OK so how do we make this look like a pumpkin pie?
Kids: "We can use this paper, it's the same color like the pie" "We need glue" "I want glue!!"

With Morah's help children study, discuss and plan the craft.
Morah: What colors do you see on the pie? What color is in the middle? What color do you see on the edge around the pie? Can you match the colored paper to the colors on the pie? OK, great so here's the plan. To make this cardboard look just like the pumpkin pie we will glue this color paper in the middle of the cardboard and this color around the edges. I'm going to get some glue.
Morah gets only one glue stick.


Morah: OH no friends, I only found one glue stick. I don't know what to do. How can we make the pie with only one glue stick.
Kids: "We can get more glue" "Look again" "We need more glue" "Give me the glue" "I want the glue" "OR we can share, let's share the glue"
Morah: OH what a great idea!!! We can share the glue just like we shared the pie. But wait a minute, how are we going to share the glue. We can't cut the glue stick like we did with the pie. How can we share the glue?
Kids: "I know!!!! We can take turns" "I want a turn" "I want a turn too" "When is it going to be my turn" "Can I go first?"
Morah: You're right!! We can take turns, taking turns is also a way that we can share something. So let's share this glue and everyone will have a turn.

Morah facilitates the sharing process as children take turns with the glue and then place the colored pieces of paper in appropriate places while looking at the printout of the pumpkin pie for reference and accuracy.

Kids: "We did it" "Wow look at our pumpkin pie" "It's so big" "Look just like the pie in the picture" "It looks the same!!!"
Morah: You're right this pie looks great, just like the one in the picture. Did you have fun making this pie?
Kids: "Yes" "Let's make another pie" "We can share the glue again"
Morah: That's right we shared the glue. If we did NOT share the glue we would not be able to make this pie. It's more fun to share!!!
Kids: "Yeah it's more fun to share" "We can share" "We shared!!!"

The process of counting and dividing the pie was repeated with this pie as well however this time we glued long strips of paper to make the separation of pieces instead of cutting the pie. We also wrote on each piece what we can share and we saved pieces of the pie for friends who were not in school on that day. We also repeated the whole pie sharing circle time box activity twice more on different days so that everyone in class had a chance to experience this lesson and thoughtfully add what they can share to our Thanksgiving Sharing Pie. Children really loved this lesson and imitated the process of counting, cutting and sharing the pie in the kitchen area during center time.

Sunday, November 7, 2010

Unexpected Pumpkin Exploration


One autumn morning a friend brought a pumpkin to school. "This is my pumpkin." We have been learning about autumn for a while and what else makes you think autumn like a round, orange pumpkin? The pumpkin was a great conversation piece in our class not to mention a wonderful sensory experience. Add a few good open ended questions and we found much more than just seeds inside of this pumpkin experience.
  • So what do we know about pumpkins?
"Pumpkins are orange and round." "This pumpkin is heavy." "When I went to the ice cream store with my mommy I saw a pumpkin there." "I have a pumpkin at home, it's on the stairs." "I go to a pumpkin patch and I saw a LOT of pumpkins there. Pumpkins grow on the ground and they was dirty, we has to clean them." "I see a pumpkin and it was HUGE!" "I don't have a big pumpkin I have a little, tiny pumpkin." "This pumpkins is not huge."
  • What do you think is inside of the pumpkin?

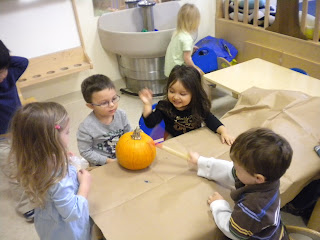
"Open it!" "I don't know." "My daddy, he open a pumpkin and I see there is SEEDS inside!" "Can we open this pumpkin ?" "Can I open it?" "No the pumpkin is too hard." "We need a knife."


  • Do you think there are seeds inside of this pumpkin?

"YES!" "I want to see the seeds!" "We going to open the pumpkin!" "Be careful Morah." "The knife is sharp, you can get a boo boo." "I don't touch the knife, only Morah can touch the knife."

"What is it?" "Wow LOOK there's seeds!" "So many!" "What are we going to do now?" "Can I touch it?"


"Lets take it out!" "Can we do that?" "Yes?" "I want to do that." "There's more seeds!" "What's that?" "It's pumpkin?" "Orange, squishy pumpkin!?" Giggles, giggles, giggles....


"It's squishy." "It's wet." "It's yucky-squishy, I don't want to touch it." "I want to touch it." "It's squishy orange." "I like pumpkin." "Can I eat it?" "It's food?" "No, you have to cook it first, right Morah?"

"Is it empty?" "No there's some more." "I want to get it." "Can you help me?"

"Now it's empty." "We cleaned the seeds." "That was fun." "I want to do it again!" "Yeah, lets do that again!" :)

Thursday, November 4, 2010

Toddlers in Autumn

Autumn is a time associated with wonderful things like back to school, festive holidays, harvest and changes in weather and natural landscape. Naturally, the themes and icons that we are learning about in this autumn unit include changes in nature, leaves, hibernation, animal migration and preparation.

So how can toddlers authentically learn about and experience autumn?
- With whole bodies, all senses, lots of fun exploration and a bit of imagination.

We began our autumn unit by first discussing what we know about the summer. The information and experience was fresh in children's minds and they all had lots to share. The discussion naturally lead to noticing that it's not as hot anymore and we are now wearing different clothes than we did in the summer. That is because it's not summer anymore it's autumn time now. So what is autumn? What does it look like? How can we tell it's autumn? How can we learn more about autumn? We love books and they're great for learning about new things so we read a book about autumn and learned that signs of autumn are all around. We then decided to take a look outside our window to see if we can notice any changes in nature.

Through the window things still looked pretty much the same as they did in the summer. We needed to take a closer look and investigate the outdoors hands on. Before going on our nature walk we remembered from the book and talked about where to look when looking for signs of autumn. We also brought explorer bags outside with us so we could bring some evidence back to class for further investigation.

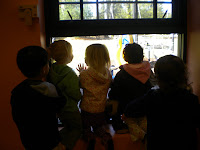
We looked high.............


We looked low...............

And here is what we found......

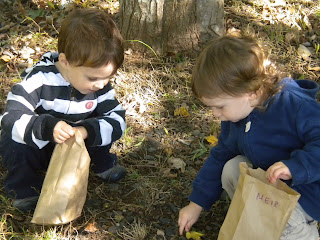
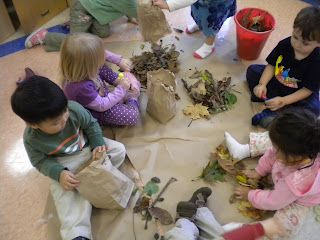
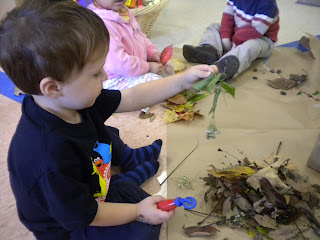
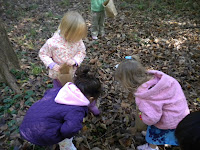
"Wow, look at all the leaves on the ground." "I think I see a bug." "Hello bug, are you there?"

"Look Morah, I found a pine cone like in the book." "I'm going to bring it to class."


"Look up there, I see some red and orange leaves." "The other leaves are still green, they're not red or orange, they didn't change colors yet."

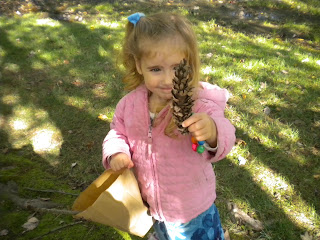
"I found some leaves on the grass, I'm going to put them in my bag so I can bring them to class."

Later in class we took a closer look at all the leafy treasures we found on our nature walk. We touched the, we smelled them, we shared what we know and learned about them and finally we concluded that signs of autumn are most certainly all around.


Here we are exploring what we found.

"I found this leaf on the ground, this leaf is red and yellow."

"I got a lot of leaves and sticks, this leaf is green."

"I found some rocks outside."

"I'm looking at this tiny leaf, it's green with a little bit of yellow."

"You want to see...... Look........."

"Leaves are messy but that's OK because we all work together to clean up."